Sign in using firebase
Introduction to Authentication with Firebase
I want to continue my exploration of firebase by going through the authentication service provided by firebase.
If you navigate to the firebase console and select the project you are working on, select Authentication from the left sidebar then select
SIGN-IN METHODyou'll see the seven ways you can allow your user to login.
(If you haven't read my previous tutorials in this series, I highly recommend going through the first tutorial on firebase's real-time database where other than learning how to use the database, I also go through setting up the project. Then, if you are interested, but not required, you can read the other tutorial on storage)
01. Setup
The setup will be exactly the same as in firebase's real-time database. We have an HTML and a JavaScript file. The html is going to be slightly different though
<!DOCTYPE html>
<html lang="en">
<head>
    <meta charset="UTF-8">
    <title>Authentication with firebase</title>
    <script src="https://www.gstatic.com/firebasejs/4.8.0/firebase.js"></script>
    <script src="https://www.gstatic.com/firebasejs/4.6.2/firebase-auth.js"></script>
    <style>
        #app{
        width:50%;
        margin: 100px auto;
        }
        .hide{
        display: none;
        }
    </style>
</head>
<body>
    <div id="app">
        <input type="email" id="txtEmail" placeholder="Enter email" /> <br/>
        <input type="password" id="txtPassword" placeholder="Enter password" /><br/>
        <button id="btnLogin" >Log in</button>
        <button id="btnSignUp" >Sign Up</button>
        <button id="btnLogOut" class="hide" >Log Out</button>
        <button id="withFB">Log In with FaceBook</button>
        <button id="withGithub">Log In with GitHub</button>
    </div>
    <div id="results"></div>
    <script type="text/javascript" src="script.js"></script>
</body>
</html>
The most important thing to note is that firebase has authentication as a separate module hence the second script tag at the top. Other than that, we have two input fields to test authentication via email and password, and then we are going to go through how to authenticate with FaceBook and GitHub. The div with
id of result will come in handy also.
To make sure that we are on the same page, you should have a
script.jswith the configuration code (as a result of going through the first tutorial)var config = {
apiKey: "*******************",
authDomain: "******.firebaseapp.com",
databaseURL: "https://******.firebaseio.com",
projectId: "******",
storageBucket: "******.appspot.com",
messagingSenderId: "***************"
};
firebase.initializeApp(config);
02. The basics
To fully appreciate the simplicity of authentication I'll first present you with the methods that we'll use, that are provided by the authentication service. Then we'll make practical use of them.
const auth = firebase.auth();
As we had to do it with database and storage service, that's how we initialise the use of authentication service. All the following methods are made available through that,
auth() function.const promise = auth.signInWithEmailAndPassword(email, pass);
auth.createUserWithEmailAndPassword(email, pass);
Those are self explanitory, that's how we'll be able to log in or sign up.
Then the code for the two providers, Facebook and GitHub, follow a slightly different convention.
const facebookProvider = new firebase.auth.FacebookAuthProvider();
const facebookPromise = auth.signInWithPopup(facebookProvider)
const githubProvider = new firebase.auth.GithubAuthProvider();
const githubPromise = firebase.auth().signInWithPopup(githubProvider);
We'll have to go through a lot of configuration linking firebase with Facebook and Github - a lot of work between the dashboards, but the code is very simple.
Finally, and most importantly we have a method which listens to authentication changes. So when a user signs in or signs out, we are able to act accordingly.
firebase.auth().onAuthStateChanged()
03. Authentication With Email And Password
Each of the authentication methods we aim to use have to be enabled, so let's first enable "Email/Password" method.
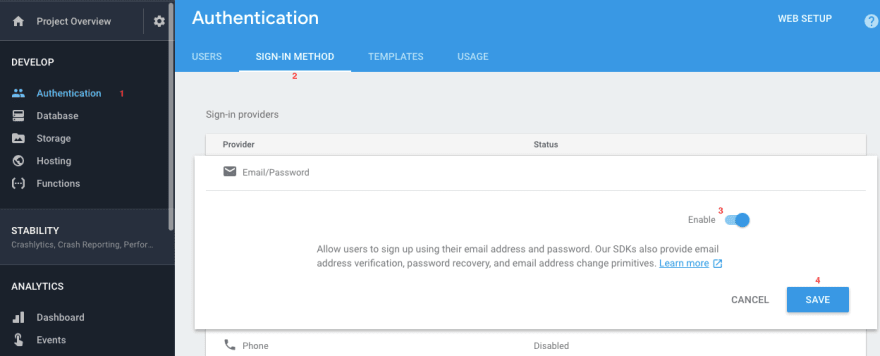
To do so navigate to the firebase console, select the project which you've created by following the instructions in the firebase's real-time databasetutorial, then select 'Authentication' and 'SIGN-IN METHOD', finally select the 'Email/Password' method and enable it
That's all for this method. If you like to verify later that a user has actually been created you can check so by navigating to 'USERS' (see the screenshot above)
03.1. Register with username and password
In
script.js let's write the code to create the user.
Before we go any further it's important to note that validation is up to us, firebase does not check for validation. If, say a user doesn't add a password with at least 6 letters firebase doesn't validate. You, as the developer need to do that. However, I'm not concerned with any of that in this tutorial. Assume that a user filled in the form and clicked "Sign Up". The following code handles that action:
document.getElementById("btnSignUp").addEventListener('click', e=>{
  const email = document.getElementById("txtEmail").value;
  const pass = document.getElementById("txtPassword").value;
  firebase.auth().createUserWithEmailAndPassword(email, pass).catch(function(error) {
   console.log(error.message);
  });
})
As you can see, line 4 registers the user.
Whilst you can't see anything, with the above code a user is created and authenticated (logged in). If you navigate to "Authentication" you'll see the user.
03.2. Sign in with username and password
When a user is registered they are already signed in. But this is the functionality to sign users in for those that have been registered using the method above.
document.getElementById("btnLogin").addEventListener('click', e=>{
  const email = document.getElementById("txtEmail").value;
  const pass = document.getElementById("txtPassword").value;
  const promise = firebase.auth().signInWithEmailAndPassword(email, pass);
  promise.catch(e=>{ console.log(e.massage)})
})
04. Acting upon state change (Sign in/Sign out)
Whenever a user signs in or signs out, we would want to change the state of our application. Granted, in this basic, vanilla javascript demo we aren't going to do anything amazing upon sign in, but still, lets make use of
onAuthStateChanged method:firebase.auth().onAuthStateChanged(user=>{
if(user){
document.getElementById("btnLogOut").classList.remove('hide')
} else{
document.getElementById("btnLogOut").classList.add('hide')
}
})
Note that
user gives you a lot more information, it gives you the id of the user - user.uid. Also a refreshToken - user.refreshToken - the use of which is beyond the scope of this tutorial.
As you can see, above we are simply making the "Log Out" button visible.
05. Logging out
Logging out is very simple:
document.getElementById("btnLogOut").addEventListener('click', e=>{
  firebase.auth().signOut();
  console.log('logged out')
})
That's it!
Note that when logging out,
onAuthStateChanged has automatically been triggered, and the log out button is now hidden06. Authentication with Facebook
Just as we've done previously, let's head over at firebase Authentication setting and enable Facebook authentication.
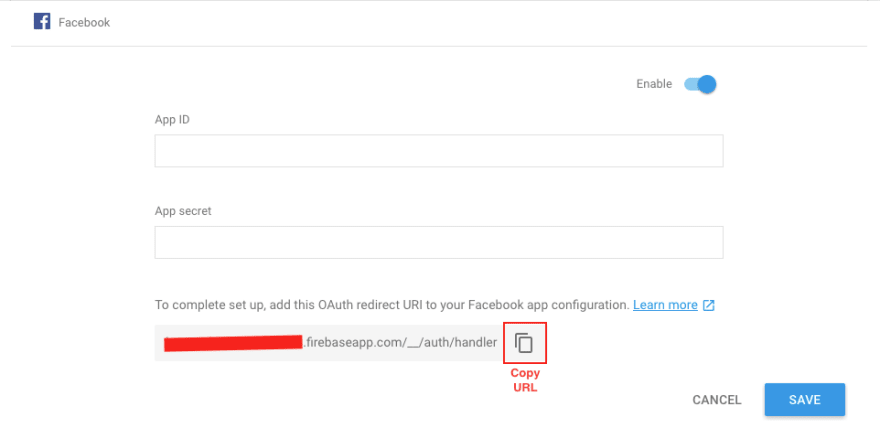
Note that it requires an "App ID" and an "App Secret". These are obtained from "Facebook app configuration" which you, as the developer, have to set up. Let's do that now.
Navigate to Facebook for developers. At the top, on the right, Hover over "My Apps" and navigate to "Add a New App", then give it a name and click "Create App Id". You are then directed to select a product.
We need "Facebook Login", hover over it and select "Set Up", then select "Web" as the desired platform. Next, give it a site url and click "save" then just navigate to "Settings", under "Facebook Login"
You need to provide it with a "Valid OAuth redirect URIs". You get that over at firebase when enabling facebook!
Copy that URI and pass it over at Facebook. Save the changes.
Then, select 'Dashboard' from the sidebar and copy the "App ID" and "App Secret" and fill the above form.
Finally, click save.
06.1 Coding the facebook authentication
document.getElementById('withFB').addEventListener( 'click', e=>{
  const provider = new firebase.auth.FacebookAuthProvider();
  const promise = firebase.auth().signInWithPopup(provider)
  promise.then(function(result) {
    console.log(result)
    // ...
  }).catch(function(error) {
          // ...
  });
})
Now, when user clicks on the facebook button, they will get the usual pop-up asking for access, and that's it!
If you have followed along, you can open the console and see that
resultsis an object that, amongst other data, it has displayName, email and photoURL; information from the facebook profile of the user. Also, result.credential.accessToken which would be important for advance use cases.07. A word on Databases
I really like to create another tutorial combining what I covered here with what I covered in firebase's real-time database.
Briefly, you can now change the database rules to something like this:
{
  "rules": {
    ".read": "auth != null",
    ".write": "auth != null"
  }
}
And then the data can only be accessed when a user is logged in.
However, there's a lot that can be done. As in most apps, some data needs to be public and some needs to be private. Going into detail here would make this tutorial too long and would not be keeping true to the topic of authentication.
Conclusion
As you saw, it's very easy to authenticate with firebase. Other methods include: phone, google, twitter, github, and anonymous. I can't say I tried them all but I'm sure they all follow the same convention, making the process very easy.
For my next tutorial in this series I wanted to conclude with hosting, but I might also try and create a small app combining everything I've covered in these three tutorials, and then conclude with hosting that mini-app, which would also solve the most vulnerable part of this process - it will hide the configuration settings.


Comments
Post a Comment